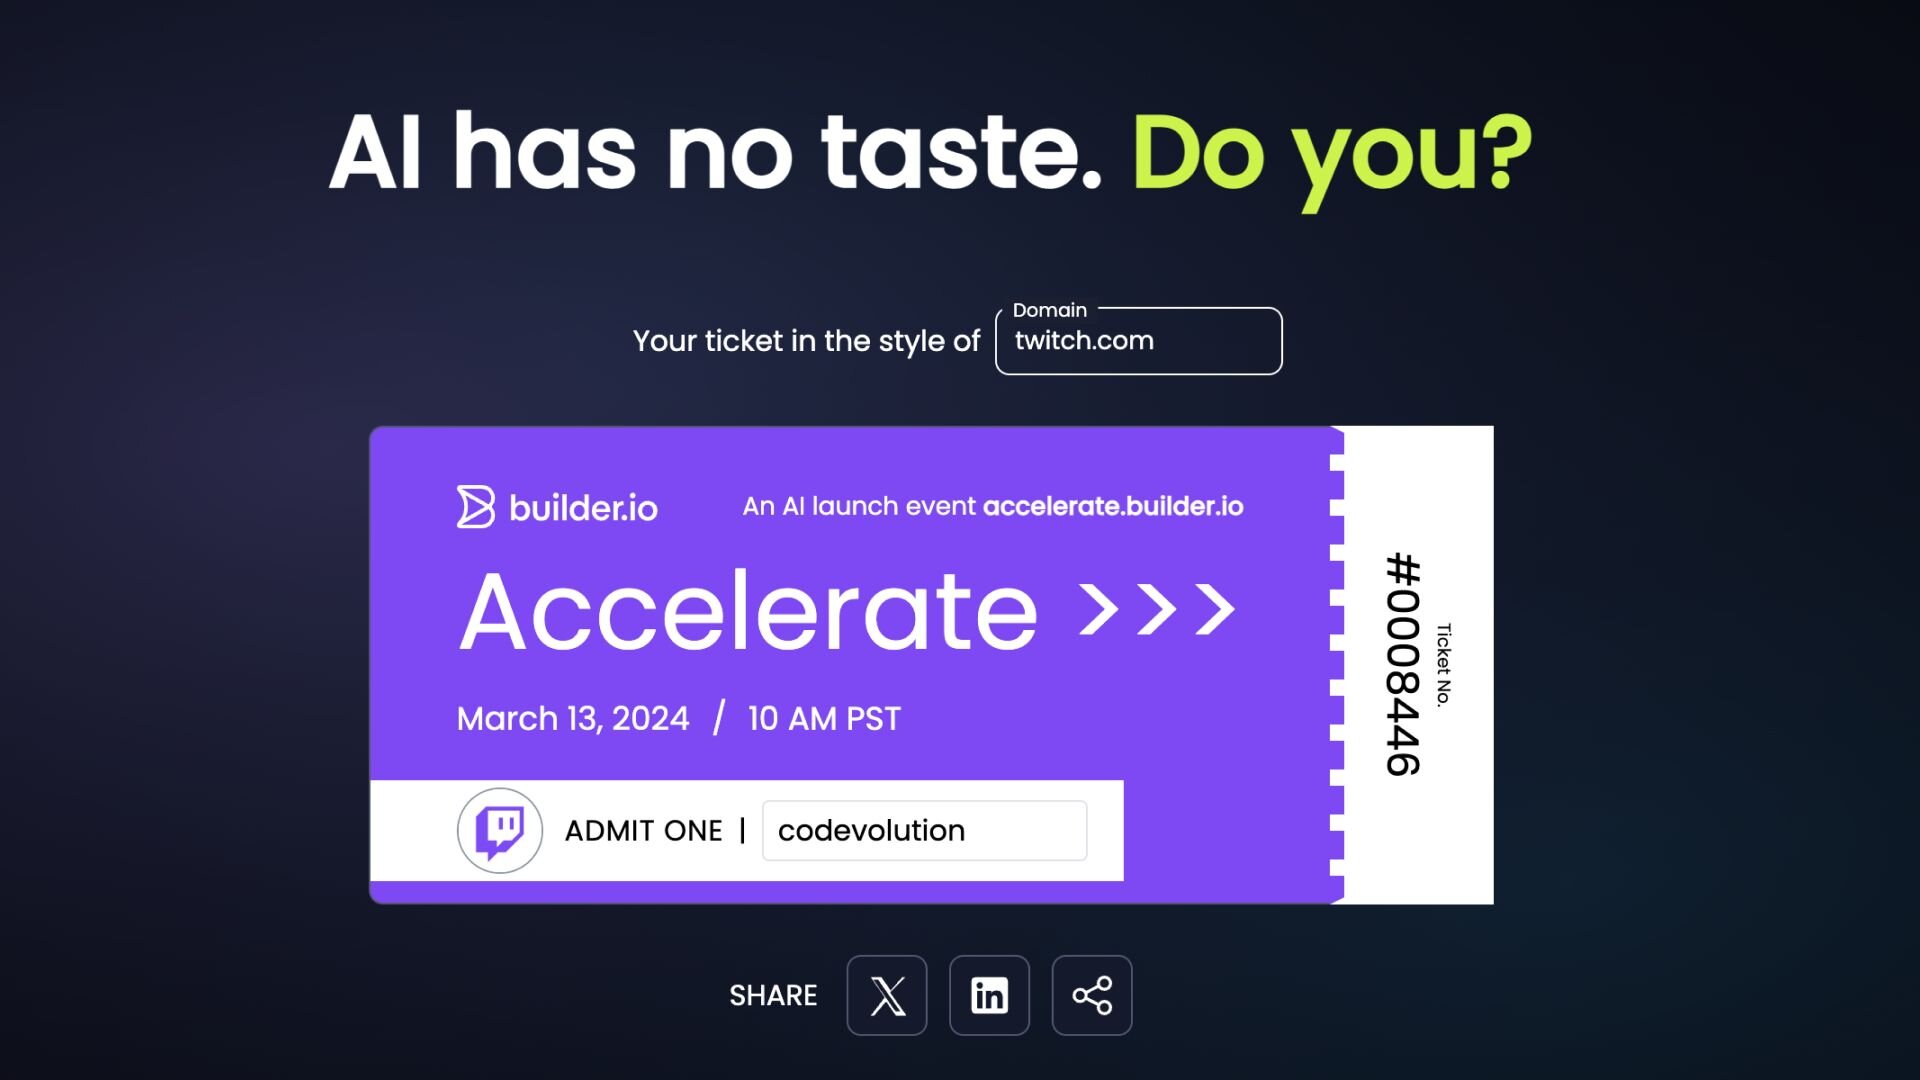
On March 13th, we will host Builder Accelerate, an AI launch event focused on leveraging AI to convert designs into code with your design system. As part of the registration experience, we’ve introduced a feature which allows the generation of a personalized event ticket based on the user's domain. For example, twitch.com will produce a ticket infused with Twitch's brand colors:
In this blog post, I’ll break down this feature using React for the frontend and Express for the backend (though it was originally built with Qwik). We will focus primarily on the concept without diving too deeply into the specifics of frameworks being used. You can find the source code on my GitHub repo.
If you're someone who learns best through visual content, check out the video tutorial.
We'll start by setting up a React application using Vite and a Node.js Express server. The goal is to create an API endpoint in Express that returns necessary ticket information based on a given domain, focusing primarily on brand colors.
First, let's dive into the Express server setup. We'll use the express and cors packages to create a basic server:
import express from "express";
import cors from "cors";

const app = express();
app.use(cors());

app.get("/", (_, res) => {
  res.send("Hello World");
});

app.listen(3000, () => {
  console.log("Server is running on port 3000");
});
Our server runs on port 3000, and visiting localhost:3000 displays a "Hello World" message.
We introduce a /ticket route that takes a domain as a query parameter. We then construct the URL to fetch the favicon associated with the domain. Google provides a convenient URL format to retrieve a site's favicon:
app.get("/ticket", async (req, res) => {
  const domain = req.query.domain;
  const faviconUrl = `https://www.google.com/s2/favicons?domain=${domain}&sz=128`;
});
Using the colorthief package, we extract the primary color and a palette of colors from the favicon:
const [primaryColorRGB, paletteRGB] = await Promise.all([
  colorthief.getColor(faviconUrl),
  colorthief.getPalette(faviconUrl),
]);
Here, primaryColorRGB holds the RGB values of the dominant color, and paletteRGB contains an array of colors representing the favicon's color palette.
The secondary color is chosen to provide a good contrast with the primary color.
Define a function to calculate the distance between two colors in RGB space. This helps in finding a color in the palette that is most dissimilar to the primary color:
function rgbDistance(color1, color2) {
  let rDiff = Math.pow(color1[0] - color2[0], 2);
  let gDiff = Math.pow(color1[1] - color2[1], 2);
  let bDiff = Math.pow(color1[2] - color2[2], 2);
  return Math.sqrt(rDiff + gDiff + bDiff);
}
Iterate through the palette to find the color that is furthest away from the primary color:
function findDissimilarColor(primaryColor, colorPalette) {
  let maxDistance = -1;
  let secondaryColor = null;

  colorPalette.forEach((color) => {
    let distance = rgbDistance(primaryColor, color);
    if (distance > maxDistance) {
      maxDistance = distance;
      secondaryColor = color;
    }
  });

  return secondaryColor;
}
Call this function with the primary color and the palette to determine the secondary color:
const secondaryColorRGB = findDissimilarColor(primaryColorRGB, paletteRGB);To ensure the text on the ticket is readable regardless of the background color, we need to determine whether the color is dark or light. Implement a function to check the luminance of a color:
1. Calculate relative luminance: The luminance of a color is a measure of the intensity of the light that it emits. Use the following function to calculate it:
function isDarkColor(color) {
  let luminance =
    0.2126 * (color[0] / 255) +
    0.7152 * (color[1] / 255) +
    0.0722 * (color[2] / 255);
  return luminance < 0.5;
}
2. Apply the function: Use this function to determine if the primary and secondary colors are dark or light. This information is crucial for setting the text color on the ticket for optimal readability:
const isPrimaryColorDark = isDarkColor(primaryColorRGB);
const isSecondaryColorDark = isDarkColor(secondaryColorRGB);
Now that all the ticket information has been calculated, return the domain, the favicon URL, the primary color in both RGB and hex formats, the secondary color in both RGB and hex formats, and whether the two colors are dark.
res.json({
  domain,
  faviconUrl,
  primaryColorRGB,
  primaryColorHex: rgbToHex(...primaryColorRGB),
  isPrimaryColorDark: isDarkColor(primaryColorRGB),
  secondaryColorRGB,
  secondaryColorHex: rgbToHex(...secondaryColorRGB),
  isSecondaryColorDark: isDarkColor(secondaryColorRGB),
});
If you navigate to localhost:3000/ticket?domain=builder.io, you should see the API returning the ticket information.
In the React frontend, create an input field to accept the domain and a button to generate the ticket. The frontend communicates with the Express backend to fetch and display the ticket information. I’ve taken the good-enough-is-fine approach to writing the React code. Here’s the most basic code to get it working:
// App.jsx

import { useState } from "react";
import { Ticket } from "./Ticket";

export default function App() {
  const [domain, setDomain] = useState("builder.io");
  const [ticketInfo, setTicketInfo] = useState({});

  const fetchTicketInfo = async () => {
    const response = await fetch(
      `http://localhost:3000/ticket?domain=${domain}`
    );
    const data = await response.json();
    setTicketInfo(data);
  };

  return (
    <div className="bg-black h-screen flex flex-col justify-center items-center">
      <input
        type="text"
        className="p-2 rounded mb-4"
        value={domain}
        onChange={(e) => setDomain(e.target.value)}
        onKeyDown={(e) => e.key === "Enter" && fetchTicketInfo()}
      />
      {!!ticketInfo.faviconUrl && <Ticket ticketInfo={ticketInfo} />}
    </div>
  );
}
Create a Ticket component in React to display the ticket and use the fetched color data to dynamically style the ticket based on the input domain's brand colors:
// Ticket.jsx
import { BuilderTicketLogo } from "./assets/BuilderLogo";
const padStartWithZero = (num = 0) => {
return num.toString().padStart(7, "0");
};
export const Ticket = (props) => {
const primaryColor = props.ticketInfo.primaryColorHex;
const secondaryColor = props.ticketInfo.secondaryColorHex;
const isPrimaryColorDark = props.ticketInfo.isPrimaryColorDark;
const isSecondaryColorDark = props.ticketInfo.isSecondaryColorDark;
const favicon = props.ticketInfo.faviconUrl;
const companyName = props.ticketInfo.domain;
const ticketNo = padStartWithZero("12345");
return (
<div className="w-[600px]">
<div className="flex">
<div
id="left"
style={{
backgroundColor: primaryColor,
color: isPrimaryColorDark ? "white" : "black",
}}
className="rounded-l-lg border-r-0 pt-8 pb-4"
>
<div className="flex justify-between items-center px-12 mb-4">
<BuilderTicketLogo isDark={isPrimaryColorDark} />
<span
style={{
color: isPrimaryColorDark ? "white" : "black",
}}
className="text-sm"
>
An AI launch event <strong>accelerate.builder.io</strong>
</span>
</div>
<div
style={{
color: isPrimaryColorDark ? "white" : "black",
}}
className="text-6xl px-12 mb-2"
>
Accelerate >>>
</div>
<div className="flex items-center px-12 mb-4">
<span className="text-lg">March 13, 2024</span>
<span
style={{
color: secondaryColor,
}}
className="text-lg mx-3"
>
/
</span>
<span className="text-lg">10 AM PST</span>
</div>
<div
style={{
backgroundColor: secondaryColor,
color: isSecondaryColorDark ? "white" : "black",
}}
className="w-4/5 flex items-center px-12 py-1"
>
<div className="bg-white rounded-full border border-gray-400">
<img
className="object-contain rounded-full"
src={favicon}
alt={companyName}
width={50}
height={50}
/>
</div>
<div className="pl-3">ADMIT ONE</div>
</div>
</div>
<div
style={{
borderLeft: `8px dashed ${primaryColor}`,
}}
className="bg-white py-8 px-4 text-black text-center [writing-mode:vertical-rl] [text-orientation:mixed]"
>
<div className="text-xs">Ticket No.</div>
<span
style={{
borderColor: secondaryColor,
}}
className={`border-l-4 text-2xl`}
>
#{ticketNo}
</span>
</div>
</div>
</div>
);
};
With TailwindCSS, remember that dynamic class names that aren't composed properly won't be compiled. You can address this in a clean way, but for simplicity, I've chosen to use the style attribute.
We add extra zeros to the start of the ticket number to ensure it's 7 digits long using the padStart method on a string.
This feature is a great addition to event registration processes, adding a personalized touch for attendees. Experiment with the code, adapt it to your needs, and integrate it into your projects to see how dynamic ticket generation can elevate your user experience.
Introducing Visual Copilot: a new AI model to convert Figma designs to high quality code in a click.
No setup needed. 100% free. Supports all popular frameworks.
Introducing Visual Copilot: a new AI model to convert Figma designs to high quality code in a click.
No setup needed. 100% free. Supports all popular frameworks.


