Watch our biggest AI launch event

Announcing Visual Copilot - Figma to production in half the time

Builder.io logo
Contact Sales
Platform
Developers
Contact Sales

Blog

Home

Resources

Blog

Forum

Github

Login

Signup

×

Visual CMS

Drag-and-drop visual editor and headless CMS for any tech stack

Theme Studio for Shopify

Build and optimize your Shopify-hosted storefront, no coding required

Resources

Blog

Get StartedLogin

enterprise plans

There are two main steps to setting up SSO with Builder and Microsoft Entra ID:

  1. Configuring Entra by creating an application integration.
  2. Configuring Builder by adding an Entra SAML Config.

Tip: Microsoft recently renamed Azure AD to Microsoft Entra ID.

  1. Go to the Microsoft Entra (formerly Azure) Portal.
  2. In your account, select Enterprise Applications.
  3. Click New Application.
  4. Click Create your own application. A dialogue opens where you can enter the name of your application. Keep the default selected option Integrate any other application you don’t find in the gallery (Non-gallery) as below:
Screenshot of the Entra Create your own application dialogue.

After you create your application:

  1. Go to Single sign-on and select SAML as the single sign-on method.
  2. Edit the Basic SAML Configuration by setting these values:
  • Identifier (Entity ID): https://builder.io
  • Reply URL (Assertion Consumer Service URL): https://builder.io/__/auth/handler
  • Sign on URL (Optional): https://builder.io/login/saml/{your-sso-name}, where {your-sso-name} is the SSO Name you create within your SSO configuration in Builder Settings
Screenshot of Basic SAML Configuration dialogue in Entra.

After you save, the Basic SAML Configuration should include: 

  • Identifier (Entity ID): https://builder.io
  • Reply URL: https://builder.io/__/auth/handler
  • Sign on URL: https://builder.io/login/saml/{your-sso-name}
  • Relay State: Optional
  • LogoutURL: Optional

The screenshot below shows these values in context:

Screenshot of Basic SAML Configuration settings in Azure.

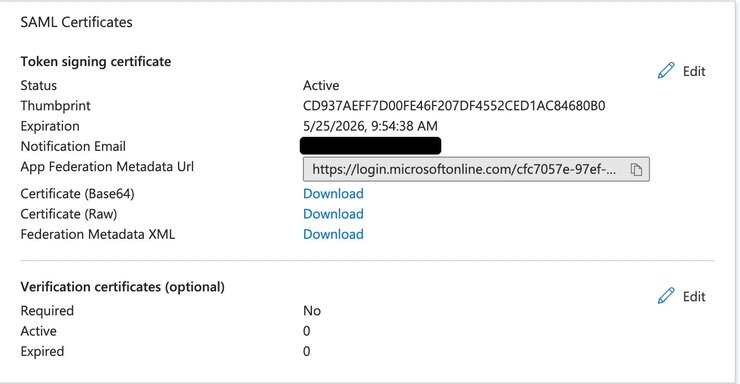
Next, download the certificate from SAML Certificates as below:

Screenshot of SAML Certificates in Azure. items include the Status, thumbprint, Expiration, Notification Email, App Federation Metadata URL. After these are three links for downloading the Certificates. After the download links is a section entitled "Verification certificates (optional)" where Required is set to No and Active and Expired are both set to zero.

With SSO enabled on your Builder account and an app, you can add your SSO details:

  1. Go back to your Builder Organization page.
  2. Click on Single Sign-on.
  3. From your Entra Application single sign-on configuration, enter the SAML information from your Entra account (Login URL, Azure AD Identifier, Logout URL, and the certificate).
  4. When choosing an SSO Name, be aware that this is a unique name across all Organizations in Builder, and it will be used to access your unique SSO login page; for example, https://builder.io/login/saml/{your-sso-name}. Choose something that is easy to bookmark or remember for you and your colleagues.
Screenshot of info to get from Azure that you'll need to provide in the Builder config.

The video below, by one of our excellent engineers, goes through the process of setting up SSO with Entra (formerly Azure) and Builder, from beginning to end. (It wasn't initially made for the docs, but it is so perfect that we just had to add it!)

By default, usernames are not mapped between Builder and identity providers. However, administrators can establish this connection by mapping a specific name field from the identity provider to the name attribute in Builder's profile settings. This configuration ensures that the username is properly set upon user login with SSO.

To map usernames between Builder and Microsoft Entra, you'll need to go to Entra to update your profile mappings.

Due to recent browser updates, if you previously used the Firebase URL, you must update your authentication domain for SSO to ensure compatibility and security.

To accommodate these changes while maintaining existing SSO configurations, use the new URL as well as the authDomain=new param with the login URL:

  1. Replace the previous redirect URL of https://builder-3b0a2.firebaseapp.com/__/auth/handler with the new domain https://builder.io/__/auth/handler. This applies to both SAML and OIDC configurations and must be updated in the Identity Provider (IdP) settings.
  2. Append the query parameter authDomain=new to the login URL. For example, a bookmarked login URL would be formatted as https://builder.io/login/saml/{your-sso-name}?authDomain=new.

Omitting this query parameter will result in incompatibility with the new custom domain. Consequently, SSO may not function with the latest versions of browsers such as Firefox and Safari.

For IdP-initiated logins, the login URL provided by the IdP must also include the authDomain=new parameter to ensure seamless integration.

If you're using OIDC, you can leverage Code Flow. For details, read Using Code Flow with SSO.

Was this article helpful?

Product

Visual CMS

Theme Studio for Shopify

Sign up

Login

Featured Integrations

React

Angular

Next.js

Gatsby

Get In Touch

Chat With Us

Twitter

Linkedin

Careers

© 2020 Builder.io, Inc.

Security

Privacy Policy

Terms of Service

Newsletter

Get the latest from Builder.io

By submitting, you agree to our Privacy Policy

Product

Platform Overview

Integrations

What's New

Open Source

Builder

Builder

Mitosis

Mitosis

Qwik

Qwik

Partytown

Partytown

Popular Guides

From Design to Code Guide

Composable Commerce Guide

Headless CMS Guide

Headless Commerce Guide

Composable DXP Guide

Design to Code

Resources

Blog

Knowledge Base

Community Forum

Partners

Templates

Success Stories

Showcase

Resource Center

Frameworks

React

React

Next

Next.js

Qwik

Qwik

Gatsby

Gatsby

Angular

Angular

Vue

Vue

Svelte

Svelte

Remix logo

Remix

Nuxt

Nuxt

Hydrogen

Hydrogen

See All

© 2024 Builder.io, Inc.

Security

Privacy Policy

SaaS Terms

Security & Compliance

Cookie Preferences