in beta
Builder's Qwik API is an performance-optimized alternative to the HTML API. It uses Qwik to prerender your content imto optimized HTML that requires no JavaScript to run, even if it has dynamic content.
Tip: The Qwik API has a limited set of features. If you want to build a Qwik app using Builder content, use the fully-featured Qwik SDK instead.
To experiment with the Qwik API, check out the Builder API Explorer, which works with your own Builder content.
The following is an example of a request and response:
https://cdn.builder.io/api/v1/qwik/YOUR_MODEL_NAME?apiKey=YOUR_API_KEY&url=PAGE_URL

# Example response
# {
#   "id": "c923kd89",
#   "name": "About page",
#   "data: {
#     "html": "<div data-builder-component="banner-ad"><div class="builder-blocks"><h1>Hello!</h1></div></builder-div>"
#   }
# }Qwik is a framework designed for extremely fast site startup, which it achieves in two ways:
- Pure HTML delivery: Qwik delivers content in pure HTML, which is the fastest way to load content.
- Transparent lazy loading: Qwik lazy loads JavaScript behavior as needed, enhancing interactivity.
To integrate Qwik into your site, you need to perform two steps:
1. Integrate qwikloader.js by including the following script tag in your HTML:
<script async src="https://cdn.builder.io/js/qwik/qwikloader.js"></script>The Qwik REST API delivers static HTML. So to make the HTML interactive, Qwik requires this small—less than 1kb—library.
2. Fetch your content. As an example, suppose you have a container, <div id="my-content"></div>, where you want to load the content. You'd use the following code snippet to fetch and inline the content into the HTML:
(async () => {
  const qwikUrl =
        new URL('https://cdn.builder.io/api/v1/qwik/YOUR_MODEL_NAME');
  qwikUrl.searchParams.set('apiKey', 'YOUR_API_KEY');
  qwikUrl.searchParams.set('url', location.href);

  const response = await fetch(qwikURL);
  const { html } = await response.json();
  document.querySelector('#my-content').innerHTML = html;
})();
Repeat the above code for each content entry if multiple content entries need to be retrieved.
Qwik works best with Server-Side Rendering (SSR). You can cache the Qwik REST API response in a CDN and include it in your SSR content. Qwik automatically downloads additional JavaScript as needed for user interactions.
The following example, available in StackBlitz, uses the Qwik API to fetch content:
<html>
  <head>
    <script async src="https://cdn.builder.io/js/qwik/qwikloader.js"></script>
  </head>
<body>
  Add your header content as needed...
  <!-- The fetched Qwik content is rendered in the div below -->
  <div id="my-content"></div>
  Add your footer content as needed...

  <script>
    (async () => {
        const qwikUrl = new URL('https://cdn.builder.io/api/v1/qwik/page');
        // Demo API key for demonstration only. Replace with your Public API key
        qwikUrl.searchParams.set('apiKey', '5b8073f890b043be81574f96cfd1250b');
        qwikUrl.searchParams.set('userAttributes.urlPath', location.pathname);

        const response = await fetch(qwikUrl);
        const { html } = await response.json();
        document.querySelector('#my-content').innerHTML = html;
    })();
  </script>
</body>
</html>
The above example sets up a page using qwikloader.js and uses an async function that fetches the content which it then assigns to the #my-content div.
Inside the async function:
- A
URLobject is created with the Qwik API endpoint URL. - Your Public API Key and user attributes, such as the URL path, are appended as query parameters to the URL.
- The content is fetched from the Qwik API using
fetch(), and the response is parsed as JSON. - The
htmlproperty from the JSON response is extracted. - The extracted HTML content is rendered inside the
<div>element with theid"my-content"usingdocument.querySelector('#my-content').innerHTML = html;.
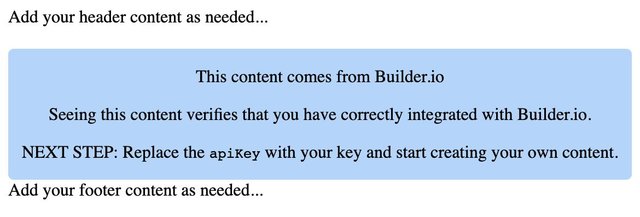
In this StackBlitz example, you can edit the code and use your own Public API Key. The following image is a screenshot of how this example renders in StackBlitz.

To facilitate previewing a page during the creation process without the need for publishing or waiting for the CDN cache to update, you can add specific parameters to the Qwik URL. These parameters include:
includeUnpublished=true: This bypasses the cache and allows retrieval of unpublished content.preview=true: This ensures that the latest version of the page is always returned.overrides.page=: The can be found in the URL of the content you are editing in the Builder editor.
The following is an example of a URL that bypasses the cache and consistently provides the latest unpublished version:
...&includeUnpublished=true&preview=true&overrides.page=...| Name | Required | Description |
|---|---|---|
| Yes | Your API key |
| Yes | The current URL of the visitor on your site; for example: |
| No | Set to |
| No | MongoDB-style query of your data; for example: |
| No | Only include these fields; for example: |
| No | Omit only these fields; for example: |
| No | Optionally use this to send targeting attributes; for example: |
| No | Specify the duration, in seconds, for caching the content. This parameter sets the Increasing the value for better performance by caching the content for a longer period, while reducing the value is suitable for content that changes more frequently. |
If you need support for features that the beta Qwik API does not yet include—such as registering components, editing Builder content on the same URL as content served, A/B testing, insights and tracking—consider the Qwik SDK as an alternative.
As this API is in beta, we encourage you to share feedback in the Builder forum.


