Use the Layers tab in the Visual Editor for identifying elements in your layout and accessing them within a list that shows their relationship to each other.
Use the Layers tab to:
- Identify nested relationships between elements.
- Troubleshoot layout issues.
- Drag and drop elements for precise placement.
- Add blocks directly from the Insert tab.
- Add, move, delete, and rename elements.
- Note which layers have features such as an animation, action, data binding, comments, or events.
- Search for a specific layer, such as some text, the type of element, or any name you gave the layer.
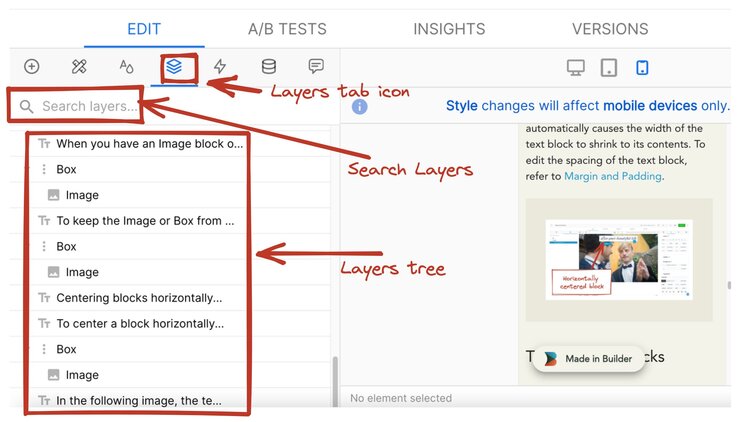
The Layers tab is indicated by an icon depicting layers or a stack. Open the Layers tab to display all the layers in the current content entry as well as search layers or even move and change nested hierarchy. The screenshot below shows the Layers tab location in two-column mode.

To rename a layer, open the Layers tab, double-click on the layer, and enter the new name. Name layers to represent what's inside to help you keep track of what each element does, and to find an element on a page if your page is long or complex. For long or complex pages, use the search to find layers by name or content.

Tip: In the Layers tab, Symbols are shown in purple.
If an element has features such as an animation, action, binding, or event, it will feature an indicator icon, as in the following example:
The following video illustrates how the Layers tab indicates actions and events on a Layer. It also shows some of the available options for actions, events, and animations.
You can select a block on the Insert tab, drag it to the Layers tab, and drop it wherever you like among the other layers.
To nest a block, hover the block over where you'd like to place it. Blue lines appear to show where you are placing the block and whether you're nesting it within another layer. If the new block is not where you want it, just drag it where it should be.
In the following video, the new Text block is nested inside the Columns block. You can test that by collapsing the Columns block and noting that the new Text block is then hidden in the list because it's inside the Columns block.
When you move a layer, you are changing the structure of your page. If an element inherits styles from its parent, and you move that layer out from under the parent, those parent styles no longer apply to that element.
To do even more with your layout, visit:


