Choosing and uploading images in Builder is quick and Builder takes care of optimization for you. This document covers the following:
To use images in Builder:
- Drag an Image Block from the Insert tab and drop it onto the work area.
- Click on the Image Block to select it.
- Click the Edit button.
- Click Choose Photo.
- Select a photo or upload your own.

Always use the Image block.
To support peak performance, Builder’s Image Block optimizes any image you add to it. This optimization takes place with the Image Block, not on background images, so make sure you always use the Image Block to help performance.
When you use Builder's Image Block for your images, Builder serves the correct optimized format for every web browser. Builder performs these optimizations so you don't have to:
- The Image Block ensures you load the smallest possible image.
- Builder analyzes your image as it relates to the layout of your page and determines the exact sizing of your image for all device sizes, automatically generating the optimal size for each screen.
- Builder uses lazy loading, which loads images only when your users need them. This reduces how much users have to download.
- Builder uses responsive page layout analysis to flag which images are below the page fold for each device so they can be lazy loaded.
- Builder converts your image to the webp format.
If you're a developer and are looking for more control over the image that is served by Builder, read the Image API documentation.
Images automatically take up full width of their parent container when they are dropped on the page. An image's width can change if you adjust the alignment. If this occurs, change the image's width to 100% and it will take up the full width again.
To delete images in Builder's Visual Editor working area, for example on a page or a section, take the following steps:
- Click on the Image Block to select it.
- Press the Delete key.
To delete images you've uploaded to Builder that are in the Choose Photo dialogue, rather than in the Visual Editor, take the following steps:
- Click on the Image Block to select it.
- Click the Edit button.
- Click Choose Photo.
- Click on the Your Recent Photos tab.
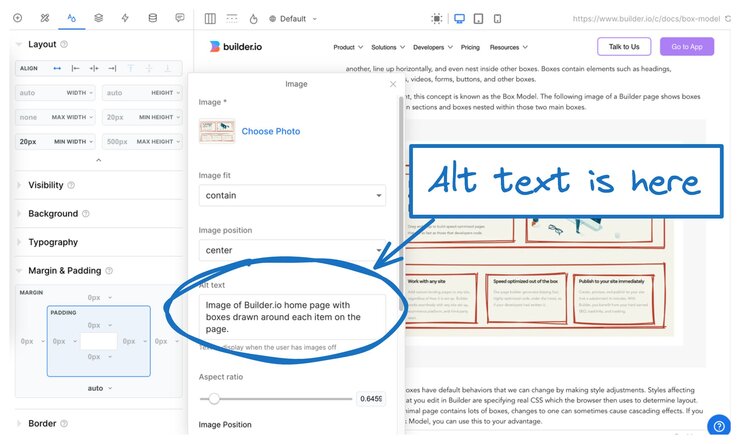
Whenever you add an image to your site, always add alt text to images. Alt text is text that you provide with the image so that screen readers and search engines know what the image depicts.
To add alt-text to an image in Builder:
- Select the Image block and click Edit.
- In the Image block's Edit dialogue, enter the alt-text in the alt-text field.
The image below shows where the alt text field is located within the Image block's Edit dialogue. Remember that images serve as visual enhancements and should not be the only source of the information.

As mentioned, Builder saves your images as WebP images. If you right-click on your live page to save an image, it will be saved as WebP.
If you're on a Mac, the Preview app can export the image to a png. If you're on a PC, Paint can convert an image.

Sometimes WebP images can exhibit unexpected behaviors in some browsers when zoom levels change. If this is an issue, we recommend changing the image format to jpg or png.
Despite the image optimization you get by using Builder's Image block, there may be times when you need to use an image that's hosted elsewhere.
You can accomplish this using a data binding.
With the Image block selected, open the Data tab and click +New Binding.
Under New Binding, next to Get, select Image from the dropdown arrow.
For the From field, enter your image URL in double quotes. This example uses https://www.cdc.gov/healthypets/images/pets/cute-dog-headshot.jpg.
Now your image will appear on your page. Here's a fiddle showing the data binding.
If you still need to upload an animated GIF, this section shows you how to upload additional file types.

Tip: Instead of using animated gifs, we recommend that you use videos for better performance. You can upload a video or embed a hosted video. In an uploaded video using the Video block, you can toggle various settings on the video such as loop, autoplay, and repeat.
If you can't select your file, you need to tell your computer that any file type is permissible. In your operating system dialogue, take the following steps.
On a Mac:
- Click the Options button and in the Format dropdown.
- Select All Files, as in the following image:
On a PC:
Next to the File name dropdown, select All Files, rather than the default of Custom Files, as in the following image:


