If your organization is using Okta as an identity provider, you can set up Single Sign-On (SSO) with either OIDC or SAML 2.0. This guide covers both methods of integrating with Okta.
Note that if you're using OIDC, you can leverage Code Flow. For details, read Using Code Flow with SSO.
To get the most out of this guide, you must be:
- On an Enterprise plan
- An Organization Admin
There are two main steps to setting up SSO with Builder and Okta:
- Configuring Okta by creating an application integration
- Configuring Builder by adding Okta
1. Go to your Okta Dashboard and expand the Applications section. The redirect URL takes the following format: https://my-org-admin.okta.com/admin/apps/active.
2. Click Applications.
3. Click the Create Application Integration button.
4. In the dialogue that opens, choose OIDC - OpenID Connect for the Sign-in method.
5. For the Application type, choose the type of application you're developing.
6. Click Next.
7. Name the app integration Builder.io.
8. Add the Builder logo. Click the image below to open the logo in a new tab if needed.

9. Add the Sign-redirect URI:
https://builder.io/__/auth/handler10. Select an option in the Assignments section according to your needs. In the example video at the end of this section, we elected to skip that part.
11. Click Save.
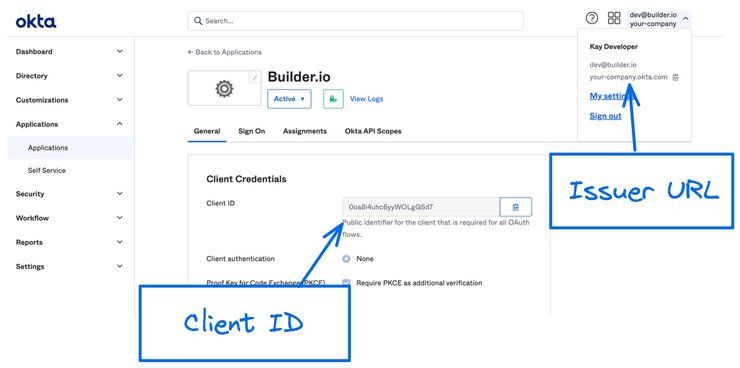
While in Okta, take note of your Client ID and your Issuer URL, which you need when you configure Builder. They are located as follows and as highlighted in the next image.
- Client ID: Okta Dashboard -> Applications -> General -> Client Credentials.
- Issuer URL: Click on your name in the upper right. Hover over the domain to copy.

By default, usernames are not mapped between Builder and identity providers. However, administrators can establish this connection by mapping a specific name field from the identity provider to the name attribute in Builder.
To map usernames in Okta:
- From within your Okta Builder.io application, click the Sign On tab.
- In the Settings section, click on Configure Profile Mapping.
- Choose the field you'd like to map for the users names.
The image below shows the profile mappings in Okta for the name.

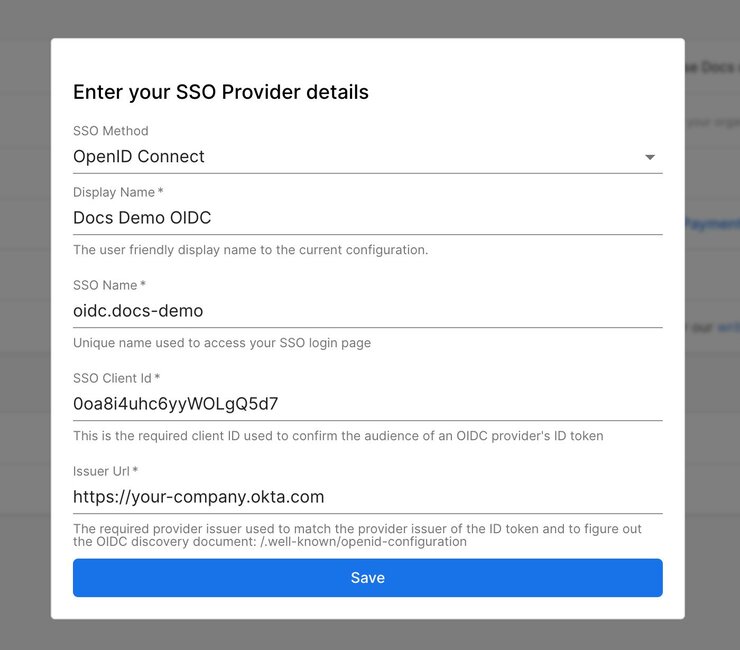
To integrate Okta with Builder:
- Go to your Organization Settings.
- Click the Edit button next to Sign Sign-On.
- For SSO method, choose OIDC.
- Enter a human-friendly display name. This is the name that your users will refer to.
- Enter a Provider ID for the SSO Name field. You'll use this to sign into Builder through a URL such as
https://builder.io/login/oidc/{your-sso-name}. - Enter the Client ID that you noted during the Okta configuration. You can find it in your Okta Admin Dashboard -> Applications -> General -> Client Credentials.
- Enter your Issuer URL that you noted during the Okta configuration. Usually, it has the format of your-company.okta.com. You can find it in the menu that displays when you click on your name at the upper right of the Okta dashboard.

After saving the SSO integration, you can test the login flow by logging out and visiting https://builder.io/login/oidc/{your-sso-name}.

Tip: You cannot use SSO if your browser doesn't support cookies. If you're in an incognito window, ensure that cookies are enabled.
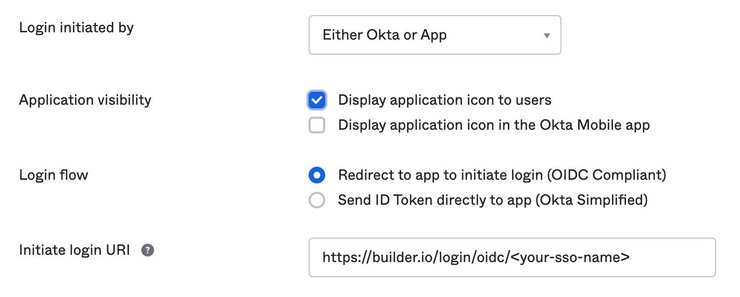
You can optionally add the integration to your Okta dashboard so users can sign into Builder directly from Okta:
- Go to the Okta Admin Dashboard -> Applications -> General -> Login.
- Add your SSO name that you configured above in the Initiate login URI field. For example,
https://builder.io/login/oidc/{your-sso-name}.
The following image illustrates where to add the SSO name:

1. Go to your Okta Dashboard and expand the Applications section. The URL takes the following format: https://my-org-admin.okta.com/admin/apps/active.
2. Click Applications.
3. Click the Create Application Integration button.
4. In the dialogue that opens, choose SAML 2.0 for the Sign-in method.
6. Click Next.
7. Name the app integration Builder.io.
8. Add the Builder logo. Click the image below to open the logo in a new tab if needed.

9. Add the Single Sign-On URL:
https://builder.io/__/auth/handler10. Add your Audience URI (SP Entity ID).
11. Click Show Advanced Settings.
12. Add your SAML Issuer ID in this format: http://www.okta.com/${org.externalKey}.
13. Click Next.


