By default, Builder pages offer a graphical UI for Search Engine Optimization (SEO). To take the best possible advantage of SEO with Builder.io content, make sure you provide metadata for search engines.
Page metadata is the data about your page that search engines use to display information in search results. For any page you publish, make sure that you include, at the very least, a title and description for your page.
The built-in Page model in Builder includes title and description fields by default. To specify a title and description on a page content entry made using the default Builder Page model:
- Go to Content.
- Click on the page to open it in the Visual Editor.
- In the Options tab, expand the section titled Docs Content Fields.
- Enter the title and description for your page.
The following video demonstrates filling out the title and description metadata in a page created with the default page model in Builder:
To add additional fields to your page model, see the Adding custom fields to a model section of Custom Fields.
By creating custom fields, you can render these fields into your Pages as needed. Consider the examples below for implementations of a title field:
To reference dynamic values in your SEO tags, use custom fields on the content. As an example, consider dynamically referencing product prices.
By referencing your external product through custom fields instead of hardcoding product prices, price updates propagate throughout your Builder content without the need for manually bulk editing content.
For more information, see the Write API documentation and Intro to Plugins.

Tip: Other possibilities for custom fields for SEO include making file fields for meta tags such as og:image or boolean fields for flagging which pages should be crawled or not crawled using the meta robots tag.
Sometimes you want to link to or maintain content that doesn't need to inform your online presence. With Builder custom fields, you can customize your Page model, so non-coding teammates can specify settings such as nofollow and noindex, which tells search engines not to convey reputation or index your page, respectively.
For credibility, link to reputable and relevant sources outside your website. When you link to another site, you share some of your site's reputation with it.
The nofollow attribute prevents reputation transfer, which is useful when linking to user-added links in comments or mentioning sites negatively. It's also handy for third-party widgets that might add unintended links to your site, ensuring control over your site's reputation.
In code, you can include the <meta name="robots" content="nofollow"> tag in the head section of a page to apply nofollow to all its links.
The noindex rule, implemented through either a meta tag or an HTTP response header, prevents search engines like Google from indexing specific content. When Googlebot encounters this rule, it excludes the page from Google Search results, even if other sites link to it. It's vital that the page remain unblocked by a robots.txt file and remain accessible to the crawler to ensure the effectiveness of the noindex rule.
For more detail, read Google's Block Search indexing with noindex and Using the robots meta tag.
In your Page model, you can add as many custom fields as you like. Custom fields could include any meta robots tags of your choice such as the noindex or nofollow.
With Builder's custom fields, you can select the input type so a noindex or nofollow setting can be a toggle. This way, non-dev teammates can quickly adjust this setting on their own. With almost 30 available custom input types, you can add as many inputs (such as for metadata or directives) to your Page model as needed, along with default values, requirements, localization as well as helper text so you users have context.
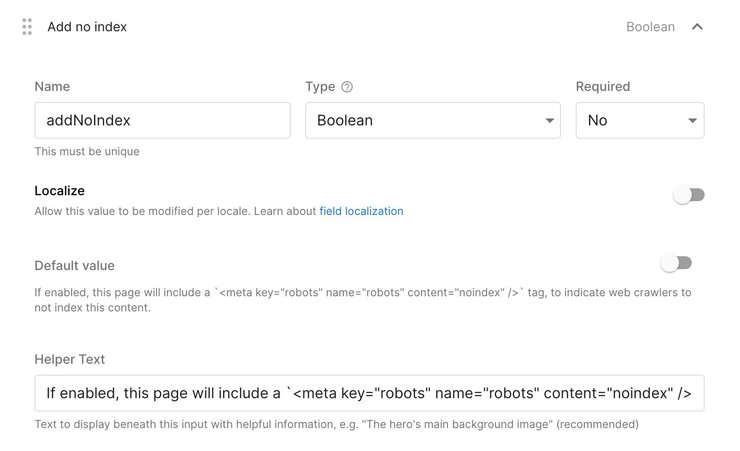
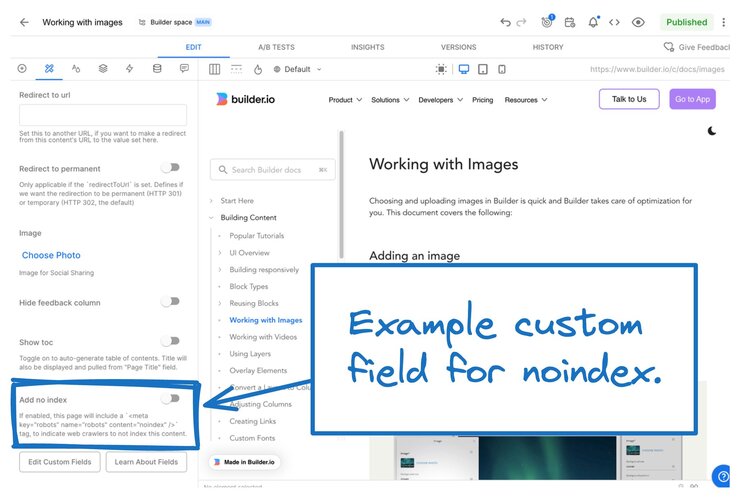
The image below shows a custom input for a noindex toggle that Builder uses in its documentation when, for example, there's a little-used page that is being phased out but the content is still occasionally needed.
The first image is of the custom field in the Page model:

This second image is how the noindex toggle appears in the Visual Editor.


Tip: The index and follow directives are search engine defaults, so you don't need to specify them. You'd only specify noindex and nofollow if you wanted to toggle these settings off.
To create a sitemap based on your content, you first need to obtain the relevant JSON data. Here's an example of how to retrieve the JSON data for a Space we use for documentation demos:
To create a sitemap based on your content, you first need to obtain the relevant JSON data. Here's an example of how to retrieve the JSON data for a Space we use for documentation demos:
https://cdn.builder.io/api/v2/content/page?apiKey=2b5ffc858d74425485135b88d2fc307a&fields=data.url&query.data.includeInSitemap.$ne=falseFor your own JSON, replace the Public API Key with your Public API Key. With your JSON, you can now create your sitemap.
Things to keep in mind:
- If your sitemap is bigger than 50MB, create multiple sitemaps.
- To impact all files on your site, place the sitemap at the root. To focus on a particular area, place it in specific directories.
- Use complete URLs, not slugs.
- Use canonical URLs.
Now that you have your JSON, which includes all the Page slugs, create a script to write out all the URLs:
const pageUrls = pages
  .map((page) => page.data.url)
This snippet:
- takes an array of
pageobjects - extracts the URLs of those pages using the
map()function - creates a new array containing only the URLs
The next part depends on your framework. You can create your sitemap manually or use a sitemap generator tool.
Here's an example of an XML sitemap based on the documentation demo query:
<?xml version="1.0" encoding="UTF-8"?>
<urlset xmlns="http://www.sitemaps.org/schemas/sitemap/0.9">
  <url>
    <loc>https://www.example.com/</loc>
  </url>
  <url>
    <loc>https://www.example.com/nextjs-test</loc>
  </url>
  <url>
    <loc>https://www.example.com/remix-test</loc>
  </url>
  <url>
    <loc>https://www.example.com/ai-demo</loc>
  </url>
</urlset>
For more information, refer to Google's Build and submit a sitemap or your framework's documentation.
Builder doesn't use iframes or canvases when rendering content with the Builder SDK on your site. In this way, what you create in Builder is as optimized as the code your developers write.
For more details, see Custom Fields.


