Livestream: How to Build an App Dashboard | Feb 6

Announcing Visual Copilot - Figma to production in half the time

Builder.io logo
Contact Sales
Platform
Developers
Contact Sales

Blog

Home

Resources

Blog

Forum

Github

Login

Signup

×

Visual CMS

Drag-and-drop visual editor and headless CMS for any tech stack

Theme Studio for Shopify

Build and optimize your Shopify-hosted storefront, no coding required

Resources

Blog

Get StartedLogin

in beta

for developers

Mapping functions, which help you map your Figma components to your code components, are essential for leveraging your existing code components to generate code when using the Builder Figma plugin.

To get the most out of this document, you should:

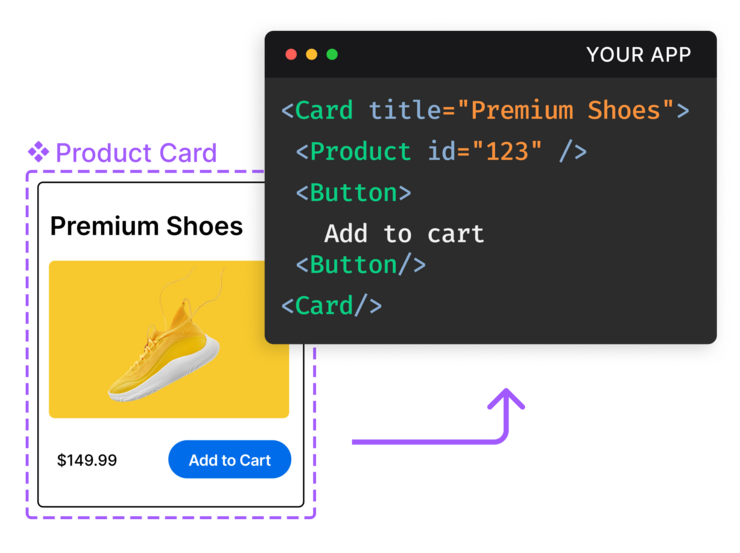
A mapping function connects your design in Figma to the corresponding code in React. It ensures that elements from the design are accurately represented in code, making it possible for Figma components to work with your application.

Builder mapping functions use JSX syntax for all frameworks, including Angular. While the examples in this document show React-style components, the same JSX syntax is used for Angular components, the only difference being that you reference your Angular component class names instead of React components.

A mapping function works by connecting your Figma design components to your React code components. For instance, consider a Button in your Figma design that has specific properties like Color, Size, and Variant, and a Button in your React code that has props like color, size, and type.

The following code example demonstrates how a mapping function can translate these properties from your Figma design into corresponding props in your React code, ensuring that your components are rendered with the correct attributes.

function Mapper(figma: FigmaButtonProps) {
  return (
    <Button
      color={figma.Color.toLowerCase()}
      size={figma.Size.toLowerCase()}
      type={figma.Variant.toLowerCase()}
    >
      {figma.$children}
    </Button>
  )
}

The mapping function understands the Figma properties and determines how to apply them to the Button component in your React code. So, if your Figma Button is primary, large, and contained, the mapping function helps create a React Button with the same color, size, and type.

The diagram below shows how the Figma properties, on the left, correspond to code, on the right:

Image of properties in Figma circled and an arrow pointing from them to their corresponding code.

This next screenshot shows how Figma layers, on the left, correspond to code, on the right.
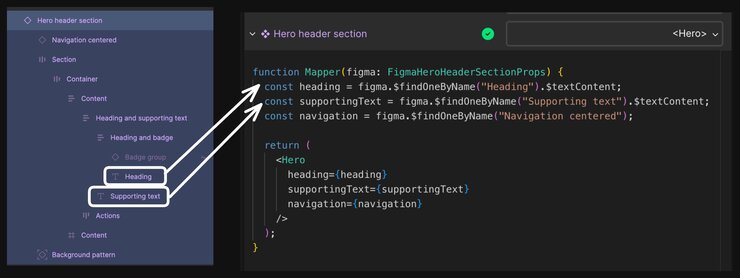
Image of layers in Figma circled and an arrow pointing from them to their corresponding code.

This way, the Builder Figma Plugin converts your Figma designs directly into React code, simplifying the process of transforming your design ideas into real, functional code components.

This section covers examples of mapping Figma properties to React props. To edit mapping functions, edit them directly in your codebase.

Although Builder's Figma plugin uses AI semantic matching to automatically identify which components in your codebase correspond to your components in Figma, every design is unique and might require additional attention during the mapping process.

The video below shows opening the plugin in Figma and editing the mapping function for an example design.

The Mapper() function takes an object representing the Figma component's properties and returns a React component with the mapped properties. All TypeScript code such as toLowerCase() is valid within the function.

You can modify and refine these auto-generated mapping functions, ensuring that the final code aligns with the design intent.

When mapping, there are times when you might need a little extra help to get the Figma property matched up with the right React prop. That's where the figma parameter in the mapper function comes into play. It's an object that provides access to various properties and methods, which are handy for dealing with more complex mapping tasks.

Purpose: Retrieves all direct child nodes of the current Figma design and returns an array.

Example: Below is an example of using $children for a button.

function Mapper(figma: FigmaButtonProps) {
  return (
    <Button>
      {figma.$children}
    </Button>
  )
}

Options: exclude, an array of strings specifying the names of child nodes to exclude from the result.

Note that $children is zero-indexed.

Purpose: Retrieves the text content from the current Figma design node. If the node is a text node, it returns its characters. For group, frame, component, or instance nodes, it aggregates the text from all child text nodes and returns it as a single string.

Example: Below is an example of using $textContent to extract text from a Figma node whose children are startIcon, text and endIcon.

function Mapper(figma: FigmaButtonProps) {
  return (
    <Button>
      {figma.$children[1].$textContent}
    </Button>
  )
}

Purpose: Maps a specific child node of the current Figma component by its layer name.

Parameters: name, a string that indicates the name of the child node to map.

Example: The code snippet below retrieves a child element in Figma by its name dialog for display within the <div>.

function Mapper(figma: FigmaProps) {
  return (
    <div>
      {figma.$findOneByName('dialog')}
    </div>
  )
}

Purpose: finds the first node that meets specified criteria.

Parameters: takes a callback function

Example: The example below specifies a node with the name of Heading.

function Mapper(figma: FigmaProps) {
  return (
    <div>
      {figma.$findOne((node) => {
        return node.name === "Heading"
    })}
    </div>
  )
}

Purpose: Traverses all child nodes of the current Figma design and applies a given function to each node.

Callback Parameters:

  • node: The current child node being visited.

Usage:

  • node.$textContent: Retrieves the text content of the child node.
  • node.name: Retrieves the layer name of the child node in Figma.
  • node.inputs: Retrieves the properties (inputs) set on the child node.
  • node.componentName: Retrieves the name of the Builder component that the child node maps to.

Example: The example below iterates over nodes and converts nodes named Header into <h1> HTML tags with their content, and directly returns the text content of nodes named Content.

function Mapper(figma: FigmaProps) {
  return figma.$visit((node) => {
    if (node.name === "Header") {
      return <h1>{node.$textContent}</h1>;
    } else if (node.name === "Content") {
      return node.$textContent;
    }
  });
}

If your components or prop types aren't showing up in the plugin, or the AI isn't mapping your props at all, be sure that you are exporting your components and specify types for the props. For more detail, read Mapping components from libraries.

The Mapper() function extracts specific content from a Figma design represented by the figma object and uses that content to compose a component.

The example snippets here are design system-dependent.

In this example, the Mapper() function is returning a Button component. It configures the button's attributes based on the provided Figma properties, such as its color, size, and variant.

These properties are mapped from Figma to their respective counterparts in the Button code component so that the button is rendered with the specified configuration defined in the Figma design.

Because Figma properties typically begin with an uppercase letter, while React component props are entirely lowercase, the toLowerCase() method is used in the mapping process to ensure consistency.

function Mapper(figma: FigmaButtonProps) {
  return (
    <Button
      color={figma.Color.toLowerCase()}
      size={figma.Size.toLowerCase()}
      type={figma.Variant.toLowerCase()}
    >
      {figma.$children}
    </Button>
  )
}

This code maps the example properties in this way:

  • Color: The color property from Figma is converted to lowercase and mapped to the React button's color prop, adhering to the component's expected prop values.
  • Size: The size property from Figma is converted to lowercase and mapped to the React button's size prop, adhering to the component's expected prop values.
  • Variant: The button's variant in Figma is also converted to lowercase and mapped to the type prop, ensuring the button's appearance in the UI matches the intended design.
This mapping process is essential for transforming Figma designs into functional React components, maintaining fidelity to the original design while leveraging React's dynamic and interactive capabilities.

To determine which properties are available for a given Figma component, select the component and refer to the Design properties on the right of the Figma UI. All of the properties in the Design tab are available for mapping to React. Here's an example from the MUI Button component which contains additional properties to our Button component from before:

Figma user interface with component properties highlighted


One of the possible outputs would be:

<Button color="primary" size="small" type="contained">Click</Button>

The mapping function translates Figma design properties into Angular component properties using JSX as an intermediate representation. Although the code seems like React syntax, it serves as a universal mapping layer that Builder uses to generate framework-specific code.

This example defines an interface extending BaseFigmaProps to specify a hypothetical Figma component's properties. The mapper function then transforms these Figma properties — like Alignment — into corresponding Angular component inputs.

Note that the JSX references your Angular component's class name, not its selector - for example, use <MyCounter> instead of <app-my-counter>.

// Example: an Angular Counter Component

import { figmaMapping, type BaseFigmaProps } from "@builder.io/dev-tools/figma";
import { MyCounter } from "../components/my-counter";

interface FigmaCounterProps extends BaseFigmaProps {
  Alignment: "Center" | "Left" | "Right";
}

figmaMapping({
  componentKey: "your-component-key",
  mapper(figma: FigmaCounterProps) {
    return (
      <MyCounter
        alignment={figma.Alignment?.toLowerCase() as "center" | "left" | "right"}
      />
    );
  },
});

In this example, the Mapper() function is returning a Hero component. It first retrieves the text content of the Figma child layers named Heading and Supporting Text. Then, Mapper() locates the Figma child layer named Navigation centered and returns it as JSX.

If there's a mapped component for the Navigation, it is returned as JSX with appropriate props; otherwise, it is rendered as a plain HTML <div>. Finally, the extracted content is assembled into the Hero component, which is returned by the function.

function Mapper(figma: FigmaHeroSectionProps) {
  // Grab the heading text from the Heading property of the Figma component
  const heading = figma.Heading;

  // Find the first Figma child layer named "Supporting text" and its text content
  const supportingText = figma.$findOneByName("Supporting Text").$textContent;

  // Find the first Figma child layer named "Navigation centered" and return it as JSX
  // If there is a mapping for the Navigation component, it will be returned as JSX
  // for that mapped component like: <Navigation ...props>...</Navigation>.
  // If there is no mapping, it will be returned as plain HTML <div>...</div>
  const navigation = figma.$findOneByName("Navigation");

  return (
    // Put all the pieces together and return the Hero component
    <Hero
      heading={heading}
      supportingText={supportingText}
      navigation={navigation}
    />
  );
}

The output would be:

<Hero 
  heading="Heading text"
  supportingText="Supporting text" 
  navigation={<Navigation ... />} 
/>

In general, mapping all children is the most common use case; however, you might have instances where you just want to pull specific layers.

For example, you can fetch all child layers from Figma and return them within the Button component:

function Mapper(figma: FigmaButtonProps) {
  return (
    // Returnns all child layers from figma
    <Button>
      {figma.$children}
    </Button>
  );
}

For which the output would include all children:

<Button>
  <img ... />
  <span>Button Text</span>
  <img ... />
</Button>

However, you can extract only a specific layer, such as just the text content from the Button above.

In this same example, if the decorative elements were already accounted for in the code, you could selectively retrieve other content from the Figma design. In this way, you could precisely map to the code component.

This example specifically gets the text from the second child and returns the Button with just the text:

function Mapper(figma: FigmaButtonProps) {
  // Use the text from the 2nd child ($children is zero indexed).
  const text = figma.$children[1].$textContent

  return (
    // Returns only the text content of the chosen layer
    <Button>
      {text}
    </Button>
  );
}

For which the output would only include the text:

<Button>Button Text</Button>

Another option is to retrieve children by their layer name. The example below extracts only the text from a layer named Label and puts it into the Button component.

function Mapper(figma: FigmaButtonProps) {
  const text = figma.$fineOneByName('Label').$textContent

  return (
    // Returns only the text content of the chosen layer
    <Button>
      {text}
    </Button>
  );
}

For which the output would only include the text:

<Button>Button Label Text</Button>

You can also specify children by reference, so that the content inside them renders in a designated location. In the example below, the Mapper() function retrieves the contents of a Figma layer named Card Contents and renders it within a Card component.

function Mapper(figma: FigmaButtonProps) {
  const contents = figma.$fineOneByName('Card Contents')

  return (
    // Returns only the text content of the chosen layer
    <Card>
      {text}
    </Card>
  );
}

For which the output would only include the text:

<Card>
  <h2>Card contents child 1</h2>
  <p>Card contents child 2</p>
</Card>

Each of these functions returns a figma node, which includes various properties.

If you directly return a Figma node, it will be rendered in JSX format. For example:

function Mapper(figma: FigmaProps) {
  return (
    <div>
      {figma.$findOneByName('Navigation')}
    </div>
  )
}

The output would be:

function Mapper(figma: FigmaProps) {
  return (
    <div>
      <Navigation ... />
    </div>
  )
}

If the layer with name Navigation is not mapped to a component, the node will be converted to JSX, as in:

function Mapper(figma: FigmaProps) {
  return (
    <div>
      <div>...</div>
    </div>
  )
}

However, if you specify a text layer, such as using $textContent, like this:

function Mapper(figma: FigmaProps) {
  return (
    <div>
      {figma.$findOneByName('Navigation').$textContent}
    </div>
  )
}

In this case, the output would be the string content of that layer, for instance:

function Mapper(figma: FigmaProps) {
  return (
    <div>
      About Us
    </div>
  )
}

Whenever you return a node within JSX, for example:

function Mapper(figma: FigmaProps) {
  return (
    <div>
      {figma.$findOneByName('dialog')}
    </div>
  )
}

It will be rendered as JSX, as the plugin integrates the node directly into the JSX.

The key takeways are:

  • If you omit .$textContent at the end, the result will be transformed into DOM nodes.
  • figma.$children also returns nodes, meaning that whatever is contained within that component will be converted into code.

With the Mapper() function, you can map design components to your existing CSS styles in your application.

Suppose you had a class in your CSS called .button-primary that you wanted to apply to the Figma components you're importing with the Builder Figma Plugin.

The button starts with an initial class of button. If the figma object has a variant property set to primary, an additional class button-primary is added.

export function Mapper(figma) {
  // Make an array to hold the CSS class names 
  // that should be applied to the <button> element.
  const classes = ['button']; 

// If figma.variant is 'primary', the class 
// 'button-primary' is added to the classes array.
  if (figma.variant === 'primary') {
    classes.push('button-primary');
  }
  // return a button with class names applied
  return <button class={classes}>{figma.Text}</button>
}

Using React or a React-based framework? If so, the class attribute should be changed to className:

return <button className={classes.join(' ')}>{figma.Text}</button>;

This ensures compatibility with React’s JSX syntax and properly applies the CSS classes to the button element.

The generic mapping function automates the process of mapping complex Figma designs, including grid-like structures. The generic mapping functinon is versatile enough to map any non-component Figma node to any corresponding code component or element.

Automating the mapping of grid-like structures is particularly useful for developers working with complex layouts that otherwise would require extensive effort to map.

How the generic mapping function works

Builder's generic mapping function runs on each non-component layer within your Figma design. Based on their properties, these layers can be converted into any element or code component.

This gives a high degree of flexibility to handle designs that include a mix of Figma components as well as non-component structural layers that should be treated more specifically than generic wrappers.

This function integrates with Builder's existing findOne() logic and enhances its capability to handle diverse and complex designs.

Example of the generic mapping function

In the mappings/ folder create a genericMapper.tsx. Below is an example where different Figma nodes are mapped based on their names:

// mappings/genericMapper.tsx

import { figmaMapping, type BaseFigmaProps } from "@builder.io/dev-tools/figma";

figmaMapping({
  genericMapper(figma: BaseFigmaProps) {
    if (figma.$name === "Grid row") {
      return <Grid>{figma.$children}</Grid>;
    } else if (figma.$name === "Section") {
      return <section>{figma.$children}</section>;
    }
    // For other nodes, do not apply the generic
    // mapper and keep the default rendering behavior
    return undefined;
  },
});

In this example:

  • A Figma node named Grid row is automatically wrapped in a <Grid> component.
  • A node named Section is mapped to a <section> HTML element.
  • Nodes that do not match specific criteria retain their default rendering behavior for flexibility and control over the design-to-code process.

Inspecting the generic mapping function

If you publish a generic mapper function, it displays in the Builder Figma Plugin. However, if you don't publish one, the plugin does not show a generic mapper function.

To display a generic mapper function in the Builder Figma Plugin, click on the Generic Mapper section to expand the mapping function as in the screenshot below:
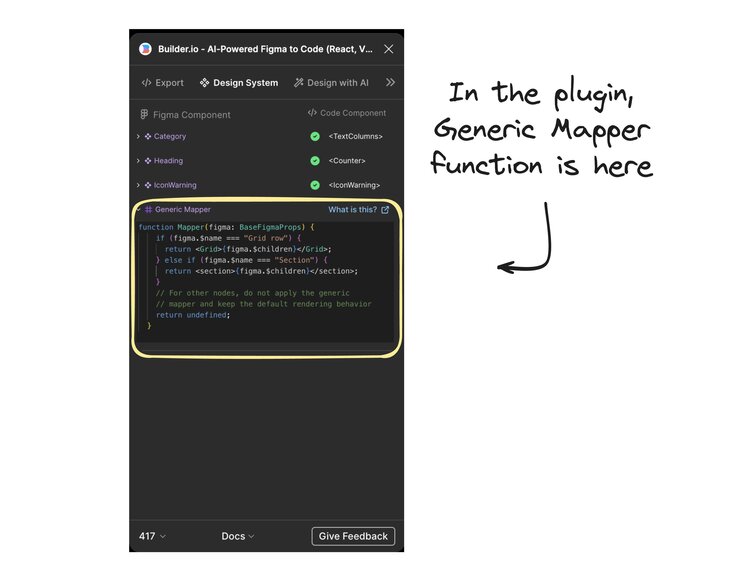
Image of the builder Figma plugin and a note with an arrow to the other nodes section. The note says, "In the plugin, Generic Mapper function is here".

Certain parts of this workflow use AI, for more information, visit How Builder Uses AI.

Was this article helpful?

Product

Visual CMS

Theme Studio for Shopify

Sign up

Login

Featured Integrations

React

Angular

Next.js

Gatsby

Get In Touch

Chat With Us

Twitter

Linkedin

Careers

© 2020 Builder.io, Inc.

Security

Privacy Policy

Terms of Service

Get the latest from Builder.io

By submitting, you agree to our Privacy Policy

  • Platform Overview

  • Integrations

  • What's New

  • From Design to Code Guide

  • Composable Commerce Guide

  • Headless CMS Guide

  • Headless Commerce Guide

  • Composable DXP Guide

  • Design to Code

  • Blog

  • Knowledge Base

  • Community Forum

  • Partners

  • Templates

  • Success Stories

  • Showcase

  • Resource Center

© 2025 Builder.io, Inc.

Security

Privacy Policy

SaaS Terms

Security & Compliance

Cookie Preferences

Gartner Cool Vendor 2024